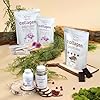
This Homemade Soap is a recipe that can be made again and again to keep your family stocked up with soap. You can make it in case of emergency, or you can make it for those family members of yours whos skin may be too sensitive to use most store bought soaps. Some of which can have harmful ingredients in them.
This homemade soap recipe has all natural ingredients and is not harsh or rough on skin. I use it everyday and my skin is healthy as could be. My kids use this soap and they have never had any issues like they do with store bought soap.
I might receive a small commission for items purchased through affiliate links in this post at no additional cost to you.
Soap supplies? Check out Brambleberry!
For a messy recipe that will make you need some of this good homemade soap, try our Calabacitas Recipe!
Another that will most definitely get your hands just the right amount of greasy is some fresh caught Fried Bream!

When my wife first began making soap, she was quite intimidated. But after she tried it once she had no problem making enough soap for the year and plenty to give to our family members in just a day or two.
Just a few simple tools and some ingredients that are easy to acquire, and you can make all of the soap that you want. Lets just get right into it.
WHAT YOU WILL NEED:

EQUIPMENT:
- Protective gloves
- Some that cover your wrists and lower forearms are recommended
- Safety glasses
- Scale
- Digital or mechanical scale that measures ounces
- Thermometer
- Soap mold
- Many things work, even a cardboard box with plastic in the bottom
- Immersion mixer
- Soap cutter
- A kitchen knife or piece of wire will work fine too
- Mixing bowls
- Liquid measuring cups
INGREDIENTS:
- 16 oz lard
- 9.5 oz coconut oil
- 6.5 oz sunflower oil
- 12.16 oz frozen liquid
- Ice cubes, water, milk, herbal tea, or juice will work
- 4.63 oz lye
- 1 oz essential oils
1. Measure out your frozen liquids
What we like to do is to use an ice tray and make ice cubes out of whatever liquid you are going to use. We almost always use milk, but you can use whichever liquid you like or have available to you.
Measure out your frozen liquid into a glass or plastic bowl and place it in the refrigerator or freezer so that it does not thaw out. If it thaws a little bit that is ok. I will explain this process more a little farther down.

2. Melt your oils and fats together
Measure them and put them in a metal or glass bowl.


Get a double boiler ready, you are going to be melting your oil and fat together to make a homogenous liquid.
A double boiler is a pot with water in it, with a bowl placed on top of it. This makes it so your ingredients that you are heating up don’t exceed 212°F. This way you can ensure that they do not burn.

Heat up the oil and fat and melt it together. Stirring as needed to combine them into one consistent substance.

It should look like this when done!
3. Combine lye and frozen liquid
PUT ON GOGGLES AND GLOVES FOR THIS STEP!!
First measure out your lye. Place lye in a plastic, glass, or stainless steel container. Do not place lye in an aluminum container.
ALWAYS PUT LYE INTO LIQUID, NEVER PUT LIQUID INTO LYE!
This is very important! The proper way to mix the two together, is to sprinkle your lye into your water little by little, stirring in between each addition of lye. The resulting mixture will create a chemical reaction and will heat up.
This is normal so don’t worry. Just don’t add too much lye at one time or it could heat up too much and splatter hot lye water around and on you.
Safety tip 1: Mix your lye outside or in a well ventilated area. The fumes which come from mixing lye and water are harmful to inhale.
Safety tip 2: Keep a bottle of vinegar near you. Lye is a high PH base, is caustic, and could burn your skin. Vinegar is an acid, will neutralize the PH and will in turn neutralize the harmful properties of lye.

Add small amounts of lye to your frozen liquid and stir each time you add some lye.

Your ice will melt and the mixture will for a chemical reaction and will heat up. If you are using milk, you have the potential of burning your milk, so make sure you pay attention and mix them slowly.
If you burn your milk and it turns brown, that is not a problem. Your bars of soap will be a little bit darker but that will not effect your soap in a negative way.
4. Mix your oil mixture and lye mixture together
Before you mix them together, check them both with a thermometer. Both mixtures need to be 90°F-110°F.
If you need to cool one of them down quickly, you can place it over an ice bath to speed up the process.

To mix them together, use your immersion mixer.
Mix them together until you have trace.

What is trace?
Trace is when you can see peaks or ripples left over from where your mixer passed. If you dip a spoon into the mixture and take it out, you should be able to see where you dipped the spoon with an impression.
5. Add, powders, fragrances, colors
After you have trace, you can add your ingredients for smell and good looks.
Here we added lemongrass scent and turmeric powder.

What can you add to soap?
Well, any number of things are great in soap! You can add things like green tea powder, rose petals, oatmeal, even sand!
You can add scents ranging from simple to elegant and it is completely up to you! You can add flowery scents like rose, lilac, lavender, and rosemary. Outdoorsy scents like birch wood, sandalwood, and cedar. Or timeless scents like frankincense and myrrh.
6. Pour your soap into molds
After you have added your custom ingredients or used the ones we have, mix it all up just enough to combine it all.
Now pour it into your soap mold!


We had some soap left over from a different recipe so my wife decided to add some decorative dollops on top of this loaf of soap! It looks so cute when it is sliced.
6. Pour it into your molds and let it sit for 24 hours
After letting it sit for 24 hours, check to see if it has solidified enough to remove it from the mold. If it is soft or mushy at all, wait another 12 to 24 hours before removing it.
Cut your loaf of soap the same day you remove it from the mold.

7. Let the soap cure for 4 to 6 weeks before use
In this 4 to 6 weeks of curing time, the soap will harden and balance its PH.
The best way to do this is to lay it out on a rack or a table in a well ventilated place. Make sure they are not touching each other so that they can get air circulation. This way the bars will dry and cure at the same rate.
HOMEMADE SOAP RECIPE

This Homemade Soap is a recipe that can be made again and again to keep your family stocked up with soap. You can make it in case of emergency, or you can make it for those family members of yours whos skin may be too sensitive to use most store bought soaps. Some of which can have harmful ingredients in them.
Materials
- 16 oz lard
- 9.5 oz coconut oil
- 6.5 oz sunflower oil
- 12.16 oz some kind of frozen liquid - water, milk, herbal tea, or juice
- 4.63 oz lye
- 1 oz essential oil
Tools
- Protective gloves
- --Some that cover your wrists and lower forearms are recommended
- Safety glasses
- Scale
- --Digital or mechanical scale that measures ounces
- Thermometer
- Soap mold
- --Many things work, even a cardboard box with plastic in the bottom
- Immersion mixer
- Soap cutter
- A kitchen knife or piece of wire will work fine too
- Mixing bowls
- Liquid measuring cups
Instructions
1. Measure out your frozen liquids and put them in the freezer or refrigerator.
2. Measure out your oils and fats and melt them together in a double boiler.
3. Carefully combine your lye and frozen liquid together in a well ventilated area.
4. Using an immersion mixer, blend the lye mixture with the oil and fat mixture. First making sure that both mixtures are between 90°F-110°F.
5. Once you see trace, mix your scents, powders, or colors in. Mix until it is the same throughout and pour into your soap mold.
6. Let the mixture sit for 24 hours and check if it is ready to come out of the mold. If it is soft, let it sit for another 12 to 24 hours.
7. Once out of the mold, slice the bars of soap and let them sit, separate from each other in a well ventilated area or on a rack.
8. Let them cure in the open air for 4 to 6 weeks.
Notes

I like to use venison in my chili feel free to use beef. Venison Chili is a meal that you Read more

There is a widespread and abundant plant in North America that just has a seemingly endless amount of uses. Of Read more

Homemade lard is a traditional way of taking fat and turning it into a very diverse and useful ingredient. Use Read more

Homemade Cottage Cheese is surprisingly easy to make! With only a few simple steps and a few simple ingredients you Read more
I started cooking at a very young age. In middle school, my friends and their parents would ask me to cook food for them because I could make something out of nothing. I love to cook up new concoctions and see what everyone likes. When I became of working age, I started as a buss boy at a barbecue restaurant, and then moved on to work all positions of the restaurant industry. From head chef of a Jamaican restaurant in Tulsa, OK, to sous chef at a highly accredited bistro on the Oregon coast, all before I turned 21.
I Inherited land in southeast Oklahoma and now spend my days working a Fedex delivery route and working with my wife and 3 young boys on our rural homestead. We raise many different kinds of animals and some vegetable gardens. I hunt all manor of large and small game, and butcher all of my own meat. We harvest wild edibles of all kinds and enjoy to cook with them and eat them.
I am grateful that you stopped by to see how we are doing and hope to see you again very soon. We would love to be friends and hope you enjoy all of the recipes and information that I can manage to put out.
Thank you, and much love!
-Eligh
I may receive a small commission for items purchased through affiliate links in this post at no additional cost to you.
- Homemade Remedy for Arthritis: Ginger Poultice - January 21, 2025
- THE WORLD FAMOUS SMELT FISH - January 9, 2025
- GROWING CORIANDER FROM SEED - December 10, 2024

KitchenAid KSM3311XAQ Artisan Mini Series Tilt-Head Stand Mixer, 3.5 quart, Aqua Sky Blue
(as of May 30, 2026 19:58 GMT -05:00 - More infoProduct prices and availability are accurate as of the date/time indicated and are subject to change. Any price and availability information displayed on [relevant Amazon Site(s), as applicable] at the time of purchase will apply to the purchase of this product.)


KitchenAid Artisan Series 5 Quart Tilt Head Stand Mixer with Pouring Shield KSM150PS, Matcha
(as of May 30, 2026 18:56 GMT -05:00 - More infoProduct prices and availability are accurate as of the date/time indicated and are subject to change. Any price and availability information displayed on [relevant Amazon Site(s), as applicable] at the time of purchase will apply to the purchase of this product.)


Instant Pot, 6-Quart Whisper Quiet 9-in-1 Electric Pressure Cooker, Slow Rice Steamer, Sauté, Yogurt Maker, Warmer & Sterilizer, Free App with 800+ Recipes, Stainless Steel
(as of May 30, 2026 21:00 GMT -05:00 - More infoProduct prices and availability are accurate as of the date/time indicated and are subject to change. Any price and availability information displayed on [relevant Amazon Site(s), as applicable] at the time of purchase will apply to the purchase of this product.)Auto Amazon Links: No products found.


IMUSA USA Granite Molcajete Spice Grinder 6-Inch, Gray
(as of May 30, 2026 19:58 GMT -05:00 - More infoProduct prices and availability are accurate as of the date/time indicated and are subject to change. Any price and availability information displayed on [relevant Amazon Site(s), as applicable] at the time of purchase will apply to the purchase of this product.)
Nut Milk Bags, All Natural Cheesecloth Bags, 12"x12", 2 Pack, 100% Unbleached Cotton Cloth Bags for Tea/Yogurt/Juice/Wine/Soup/Herbs, Durable Washable Reusable Almond Milk Strainer(Weave 66x70)
(as of May 31, 2026 06:04 GMT -05:00 - More infoProduct prices and availability are accurate as of the date/time indicated and are subject to change. Any price and availability information displayed on [relevant Amazon Site(s), as applicable] at the time of purchase will apply to the purchase of this product.)


Genuine Handmade Mexican Mortar and Pestle Set- 8 Inches, Molcajete Mexicano — Mexican Cookware Perfect as Salsa Bowls, Guacamole Bowl and Masher, Mortero Para Cocina made from Volcanic Rock in Mexico
(as of May 30, 2026 20:24 GMT -05:00 - More infoProduct prices and availability are accurate as of the date/time indicated and are subject to change. Any price and availability information displayed on [relevant Amazon Site(s), as applicable] at the time of purchase will apply to the purchase of this product.)

Weston Stainless Steel Cone and Pestle Set (83-3030-W), 2 Quart Capacity, Dishwasher Safe, 1.9-Liter, Silver
(as of May 30, 2026 21:04 GMT -05:00 - More infoProduct prices and availability are accurate as of the date/time indicated and are subject to change. Any price and availability information displayed on [relevant Amazon Site(s), as applicable] at the time of purchase will apply to the purchase of this product.)


Micro Ingredients Multi Collagen Peptides Powder, 1lb – Hydrolyzed Type I,II,III,V,X with Biotin, Hyaluronic Acid, Vitamin C – Unflavored Collagen for Women & Men, Easy Dissolve, 41 Servings
(as of May 30, 2026 17:42 GMT -05:00 - More infoProduct prices and availability are accurate as of the date/time indicated and are subject to change. Any price and availability information displayed on [relevant Amazon Site(s), as applicable] at the time of purchase will apply to the purchase of this product.)


Wild Rice with Lambsquarters | The Good Old Way
Wednesday 27th of November 2024
[…] for the clean up, try this recipe for Homemade Soap, which is not as hard as you might […]
EASY HOMEMADE LARD RECIPE | The Good Old Way
Wednesday 27th of November 2024
[…] different ways to use lard, try Homemade Soap for a tradition use for lard. Also check out my favorite Curry Carrots recipe which uses lard to […]
HOW TO MAKE HOMEMADE BUTTER | The Good Old Way
Wednesday 27th of November 2024
[…] SIMPLE HOMEMADE SOAP RECIPE […]
HOW TO MAKE FERMENTED GARLIC HONEY | The Good Old Way
Tuesday 14th of May 2024
[…] SIMPLE HOMEMADE SOAP RECIPE […]
The Best Fresh Caught Bream Recipe | The Good Old Way
Saturday 16th of March 2024
[…] Later wash your hands up after eating this fish with Simple Homemade Soap! […]