To make apple cider vinegar is a simple process! Apple cider vinegar is believed to offer several benefits for the skin and scalp. It’s said to help balance pH levels, which can reduce acne and improve skin texture.
Additionally, it may help soothe scalp irritation, fight dandruff, and add shine to hair. However, it’s essential to dilute it properly and perform a patch test to avoid adverse reactions.
I might receive a small commission for items purchased through affiliate links in this post at no additional cost to you.
In This Post
WHOLESOME HOBBIES TO TRY
THE LINK BETWEEN FOOD AND DEPRESSION
MUSHROOM POWDER – MUSHROOM COFFEE
Equipment Needed to Make Apple Cider Vinegar
- A large glass jar (1-gallon size at least)
- A cheesecloth or coffee filter
- A rubber band
- Glass bottles for storing the finished vinegar

Instructions to Make Apple Cider Vinegar at Home.
- Get some apples and chop them up into small pieces. (browned, bruised, cores, peels)
- Put the apple pieces in a jar three-fourths the way up, and cover the apples with water.
- Add a bit of sugar to help the process. 1 tablespoon per cup of water.

- Cover the jar with a clean cloth and secure it with a rubber band. This lets air in but keeps bugs out.
- Let it sit for about two weeks in a warm, dark place, like a cupboard or pantry.
- Check on it sometimes to make sure it looks okay. You should see bubbles forming, which means it’s fermenting.

- After a couple of weeks, the apples will look kind of mushy and the liquid will smell like vinegar. That’s a good sign!
- If there is any brown or greyish gunk on top it’s okay, just scrap it off.
- Strain out the apple pieces using a strainer or cheesecloth.
- Put the liquid back in the jar and cover it again with the cloth.
- Let it sit for 2-4 more weeks to get even stronger.

- Taste it to see if it’s tangy enough for you. If not, you can let it sit longer.
- Once it’s tasty, transfer it to a clean bottle and store it in the fridge. it will not go bad.
- If a gelatinous blob forms on your vinegar, you’ve made a vinegar “mother”! This can kickstart future batches. You can store it separately or let it float in the vinegar as you keep it.
Enjoy your homemade apple cider vinegar in your cooking or as a health tonic!
Health Benefits for Your Scalp

- Balance pH: ACV can make your scalp less acidic, which may reduce dandruff and itching.
- Fight Bacteria: It has antibacterial properties, which can help with scalp infections.
- Improve Hair: ACV can make your hair shiny and smooth by cleaning out buildup from hair products.
NATURAL ALTERNATIVE MEDICINE BOOKS
HERBAL HEALING BEST SELLER – BARBARA ONEILL
NATURAL REMEDIES BEST SELLER – BARBARA ONEILL
Here’s How to Use Apple cider vinegar:
- Mix equal parts water and ACV in a spray bottle. You can add a few drops of essential oil to boost and add benefits.
- After shampooing, spray it onto your scalp and massage it in gently.
- Leave it on for a few minutes.
- Rinse it out well with water.
Do this a few times a week. Just remember to always dilute ACV with water before using it on your scalp to avoid any irritation.
APPLE CIDER VINEGAR RECIPE

We homesteaders are obsessed with apple cider vinegar! We use it for cleaning, cooking, and even skincare. Plus, its health benefits are amazing. But guess what? You can basically make it yourself for free!
Ingredients
- 1 Tablespoon Sugar per cup water
- Apples - bruised, browned, peels or cores.
Instructions
Fill the glass jar about three-quarters full with apple peels and cores.
Combine the sugar and water until mostly dissolved, then pour over your apple chunks and peices until they're submerged. Leave some room at the jar's top.
Loosely cover the jar using a coffee filter or fabric scrap secured with a rubber band so bugs don't get in and place it in a warm, dark spot for around two weeks.
Give it a gentle stir every few days, if you want. If you see any brownish or greyish scum on top, remove it.
After two weeks, strain out the apple scraps from the liquid.
At this stage, your vinegar should have a sweet apple cider scent, but it might still lack that tangy flavor.
Dispose of the scraps and set the strained liquid aside for another 2-4 weeks.
You'll know your apple cider vinegar is ready when it has that distinctive vinegary aroma and taste. If it's not quite there yet, let it sit longer.
Once you're happy with the taste, seal and store it indefinitely. It won't go bad.
If a gelatinous blob appears on top, congrats! You've created a vinegar "mother". You can use it to start future batches or leave it in the vinegar as you store it.
Use your homemade vinegar for cooking, cleaning, and more!
Notes
Equipment needed
A large glass jar (1-gallon size at least)
A cheesecloth or coffee filter
A rubber band
Glass bottles for storing the finished vinegar
Nutrition Information:
Serving Size:
1Amount Per Serving: Calories: 0Total Fat: 0gSaturated Fat: 0gTrans Fat: 0gUnsaturated Fat: 0gSodium: 0mgCarbohydrates: 0gFiber: 0gSugar: 0.4gProtein: 0g

If you have never laid eyes on a chanterelle mushroom before, this new endeavor might be slightly intimidating to you. Read more

These Easy Fire Starters are made with common household items that you normally throw away! Just 3 materials you need Read more

Baked Brie is a wonderful way to start or finish a meal! Great for holidays or family get togethers, anyone Read more

Homemade lard is a traditional way of taking fat and turning it into a very diverse and useful ingredient. Use Read more
I started cooking at a very young age. In middle school, my friends and their parents would ask me to cook food for them because I could make something out of nothing. I love to cook up new concoctions and see what everyone likes. When I became of working age, I started as a buss boy at a barbecue restaurant, and then moved on to work all positions of the restaurant industry. From head chef of a Jamaican restaurant in Tulsa, OK, to sous chef at a highly accredited bistro on the Oregon coast, all before I turned 21.
I Inherited land in southeast Oklahoma and now spend my days working a Fedex delivery route and working with my wife and 3 young boys on our rural homestead. We raise many different kinds of animals and some vegetable gardens. I hunt all manor of large and small game, and butcher all of my own meat. We harvest wild edibles of all kinds and enjoy to cook with them and eat them.
I am grateful that you stopped by to see how we are doing and hope to see you again very soon. We would love to be friends and hope you enjoy all of the recipes and information that I can manage to put out.
Thank you, and much love!
-Eligh
I may receive a small commission for items purchased through affiliate links in this post at no additional cost to you.
- Homemade Remedy for Arthritis: Ginger Poultice - January 21, 2025
- THE WORLD FAMOUS SMELT FISH - January 9, 2025
- GROWING CORIANDER FROM SEED - December 10, 2024

KitchenAid KSM3311XAQ Artisan Mini Series Tilt-Head Stand Mixer, 3.5 quart, Aqua Sky Blue
(as of March 11, 2026 01:11 GMT -05:00 - More infoProduct prices and availability are accurate as of the date/time indicated and are subject to change. Any price and availability information displayed on [relevant Amazon Site(s), as applicable] at the time of purchase will apply to the purchase of this product.)


KitchenAid Artisan Series 5 Quart Tilt Head Stand Mixer with Pouring Shield KSM150PS, Matcha
(as of March 11, 2026 02:58 GMT -05:00 - More infoProduct prices and availability are accurate as of the date/time indicated and are subject to change. Any price and availability information displayed on [relevant Amazon Site(s), as applicable] at the time of purchase will apply to the purchase of this product.)


Instant Pot, 6-Quart Whisper Quiet 9-in-1 Electric Pressure Cooker, Slow Rice Steamer, Sauté, Yogurt Maker, Warmer & Sterilizer, Free App with 800+ Recipes, Stainless Steel
(as of March 11, 2026 00:28 GMT -05:00 - More infoProduct prices and availability are accurate as of the date/time indicated and are subject to change. Any price and availability information displayed on [relevant Amazon Site(s), as applicable] at the time of purchase will apply to the purchase of this product.)Auto Amazon Links: No products found.


IMUSA USA Granite Molcajete Spice Grinder 6-Inch, Gray
(as of March 11, 2026 06:13 GMT -05:00 - More infoProduct prices and availability are accurate as of the date/time indicated and are subject to change. Any price and availability information displayed on [relevant Amazon Site(s), as applicable] at the time of purchase will apply to the purchase of this product.)
Nut Milk Bags, All Natural Cheesecloth Bags, 12"x12", 2 Pack, 100% Unbleached Cotton Cloth Bags for Tea/Yogurt/Juice/Wine/Soup/Herbs, Durable Washable Reusable Almond Milk Strainer(Weave 66x70)
(as of March 11, 2026 15:15 GMT -05:00 - More infoProduct prices and availability are accurate as of the date/time indicated and are subject to change. Any price and availability information displayed on [relevant Amazon Site(s), as applicable] at the time of purchase will apply to the purchase of this product.)


Genuine Handmade Mexican Mortar and Pestle Set- 8 Inches, Molcajete Mexicano — Mexican Cookware Perfect as Salsa Bowls, Guacamole Bowl and Masher, Mortero Para Cocina made from Volcanic Rock in Mexico
(as of March 11, 2026 06:13 GMT -05:00 - More infoProduct prices and availability are accurate as of the date/time indicated and are subject to change. Any price and availability information displayed on [relevant Amazon Site(s), as applicable] at the time of purchase will apply to the purchase of this product.)
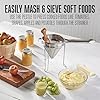
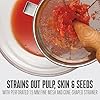
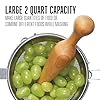

Weston Stainless Steel Cone and Pestle Set (83-3030-W), 2 Quart Capacity, Dishwasher Safe, 1.9-Liter, Silver
(as of March 11, 2026 06:13 GMT -05:00 - More infoProduct prices and availability are accurate as of the date/time indicated and are subject to change. Any price and availability information displayed on [relevant Amazon Site(s), as applicable] at the time of purchase will apply to the purchase of this product.)

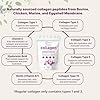

Micro Ingredients Multi Collagen Peptides Powder, 1lb – Hydrolyzed Type I,II,III,V,X with Biotin 10000mcg, Hyaluronic Acid, Vitamin C – Unflavored Collagen for Women & Men, Easy Dissolve, 41 Servings
(as of March 11, 2026 15:01 GMT -05:00 - More infoProduct prices and availability are accurate as of the date/time indicated and are subject to change. Any price and availability information displayed on [relevant Amazon Site(s), as applicable] at the time of purchase will apply to the purchase of this product.)


EASY HOMEMADE PINE CLEANER: HOW TO VIDEO INCLUDED | The Good Old Way
Wednesday 27th of November 2024
[…] How to Make Apple Cider Vinegar: EASY TO FOLLOW | The Good Old Way […]